Classroom Management
Visual Timetables
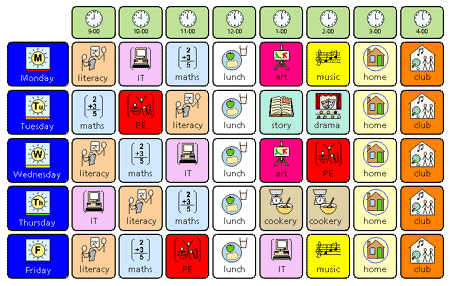
There are many different layouts for making Visual Timetables. Here is a worksheet for making a week timetable in Communicate: In Print 2.
Making a Time table in Communicate: In Print 2
Open a new Document
1. Change the paper size to Landscape:
- Click on the file menu
- Click on Document set up
- Click on Landscape, ok
2. Make your first content cell: ![]()
- Click on the constrained frame button . -->
- Make a small cell by clicking and dragging in your document.
- Right click on the cell to highlight - blue frame
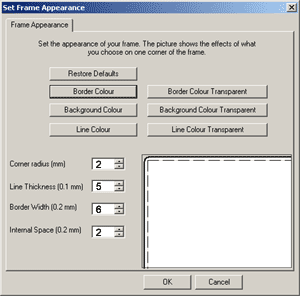
- Click on Frames and Pictures menu
- Click on Appearance
- Set as follows
- Choose Border Colour Transparent
- Click ok
3. Making the cell into a table:
- Select your cell
- Click on Frames and Pictures menu
- Click Make a table and set as follows then click ok.
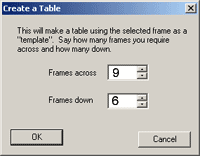
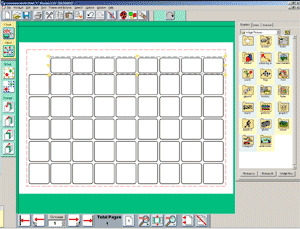
- Drag and move the yellow framed table to size as required.
4. Removing the top left cell and creating the times of day row:
Adjust button ![]() | ungroup button
| ungroup button ![]() | group button
| group button ![]()
- Click on the adjust botton
- Click on the ungroup button
- Click on the top left hand cell and click on scissors to delete
- Click the group button , then click on all the cells in the top row.
- Click the group button again until the yellow frame appears around the top row.
- Click on yellow frame and make these cells smaller in depth.
5. Filling the top row:
- Click on the top row
- Click on the Create button, then expand , then align centre, then align middle.
 ->
->  ->
->  ->
-> 
- Click off the yellow frame.
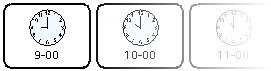
- Fill in the top row with times of the day, e.g. 9-00
6. Filling in the days of the week:
- Click on the adjust botton
- Click the group button , then click on all the cells in the first column.
- Click the group button again until the yellow frame appears around the column.
- Click on yellow frame and make these cells wider.
- Like before, click on the Create button, then expand , then align centre, then align middle.
-> -> ->
- Click off the yellow frame.
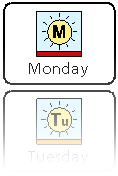
- Fill in the column with the days of the week, Monday, Tuesday etc..
7. Filling in the remaining cells:
- Drag a frame across remaining cells making sure all the cells are contained within the frame, then hold Ctrl G . This will put a yellow frame around these remaining cells.
- Set the fint and graphic size e.g. 14 and 16
- Click on align centre and middle.
->
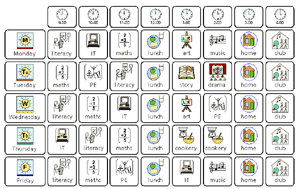
- Fill in the rest of the cells with activities for the week, etc literacy, numeracy etc.
- To save on typing highlight text then copy and paste from toolbar for activities which are repeated throughout week.
8. Colour the cells:
- Click on the days colum
- Click on the Frames and Pictures menu
- Click on Appearance
- Click on Background colour
- Choose a colour
- Click ok
- Repeat for the times row.
- Then ungroup the main set of cells and colour code each subject
Visual Timetables | Using Visual Timetables | Making Visual Timetables | Activity Outcomes
